3.2 Connection

3.2.1 Connection

PBX features and settings can be customised using a PC and the KX-TE Maintenance Console software.
Programming can be performed both on-site, using a PC connected directly to the PBX, and off-site, by accessing the PBX via modem.

Serial Interface Connection

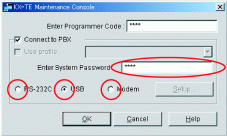
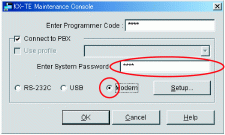
A PC can be connected to the RS-232C port of the PBX, or to the USB port for faster access.
imc3510m_te.gif
Notes
For pin assignments and maximum cabling distance, refer to "2.8 Connecting Peripherals".
When connecting the KX-TE Maintenance Console to the PBX using an RS-232C cable, assign the following values to the Serial Interface (RS-232C) port of the PBX through system programming, "SMDR RS-232C Parameter [800]":
Baud Rate: 9600 bps
Word Length: 8 bits
Parity Bit: None
Stop Bit: 1 bit

Installing the USB Driver

CAUTION
Installing the USB driver may prevent the USB driver for KX-TDA series or PC Console/Phone Software from functioning correctly. In this case, update the USB drivers as necessary from the following folders on the included CD-ROM:
KX-TDA Series: CD-ROM Drive:\TDA_USB Driver\TDA_USB Driver
PC Console/Phone Software: CD-ROM Drive:\TDA_USB Driver\T7601_USB Driver
Note
Before installing or uninstalling the driver, be sure to close any open applications.
Windows 98SE
1. Connect the PC to the PBX with a USB cable.
The Add New Hardware Wizard will appear.
2. Click Next.
3. Select Search for the best driver for your device. [Recommended], then click Next.
4. Select Specify a location, then click Browse.
5. Specify the folder containing the USB driver, CD-ROM Drive:\USB driver\Win98, then click OK.
6. Click Next.
7. Click Next.
8. Click Finish.
Note
If a dialog box appears asking you to restart your PC, restart the PC.

Windows Me
1. Connect the PC to the PBX with a USB cable.
The Add New Hardware Wizard will appear.
2. Select Specify the location of the driver [Advanced], then click Next.
3. Select Search for the best driver for your device. [Recommended].
4. Select Specify a location, then click Browse.
5. Specify the folder containing the USB driver, CD-ROM Drive:\USB driver\WinMe, then click OK.
6. Click Next.
7. Click Next.
8. Click Finish.
Note
If a dialog box appears asking you to restart your PC, restart the PC.

Windows 2000
1. Connect the PC to the PBX with a USB cable.
The Found New Hardware Wizard will appear.
2. Click Next.
3. Select Search for a suitable driver for my device. [Recommended], then click Next.
4. Select Specify a location, then click Next.
5. Click Browse, and specify the folder containing the USB driver, CD-ROM Drive:\USB driver\Win2000, then click Open.
6. Click OK.
7. Click Next.
8. Click Finish.

Windows XP
1. Connect the PC to the PBX with a USB cable.
The Found New Hardware Wizard will appear.
2. Select Install from a list or specific location [Advanced], then click Next.
3. Select Search for the best driver in these locations.
4. Select Include this location in the search:, then click Browse.
5. Specify the folder containing the USB driver, CD-ROM Drive:\USB driver\WinXP, then click OK.
6. Click Next.
7. Click Continue Anyway.
8. Click Finish.

3.2.2 Starting KX-TE Maintenance Console for the first time

When you start the KX-TE Maintenance Console with the Installer Level Programmer Code and connect to the PBX for the first time after initialisation (with factory default setting), Quick Setup will launch automatically. During Quick Setup, you will setup:
The country code of the PBX. (This setting is only available when the model code is set to "CE" or "NE", and the country codes of the PBX and Maintenance Console do not match.)
The date and time. The PBX uses the date and time set to the PC.
The System Password.
The operator extension number.
Automatic Configuration for CO Line Type (DTMF/Pulse).
The feature numbers for Operator Call and Automatic Line Access.
Extension numbers and names.
The Numbering Plan type.
Ringing assignment for each outside (CO) line (either all extensions, or a specific extension).
Note
The screenshots shown here are for reference only, and may differ from the screens displayed on your PC.
 
1.
Start the KX-TE Maintenance Console software from the start menu. (StartProgramsKX-TE Maintenance Console)
prog_code.gif
2.
Type the Installer Level Programmer Code that was set during the KX-TE Maintenance Console installation.
Screen-USB.gif
3.
a. Click the check box to connect to the PBX. Options will appear as shown here, on the left.
b. Type the System Password. (default: 1234)
c. Select the method of connection.
d. Click OK to log in.
 
4.
Quick Setup starts. Follow the on-screen instructions and assign the items as prompted.
Note
Software features, design, and system requirements are subject to change.

3.2.3 Accessing PBX via Internal Modem

 
1.
Start the KX-TE Maintenance Console software from the start menu on your PC. (StartProgramsKX-TE Maintenance Console)
prog_code.gif
2.
Type the Installer Level Programmer Code that was set during the KX-TE Maintenance Console installation.
connect-PBX.gif
3.
Click the check box to connect to the PBX. Options will appear as shown here, on the left.
4.
Type the System Password. (default: 1234)
5.
Select Modem, and click Setup.
When the mode of the PBX outside (CO) line that will be accessed is 'MODEM':
1. For Dial Number, enter the telephone number assigned to the internal modem of the PBX.
2. Select Auto (Tone) or Auto (Pulse) for Dial Type.
3. Click OK.
4. Click OK. The PC will connect to the PBX.
When the mode of the PBX outside (CO) line that will be accessed is 'DISA':
1. For Dial Number, enter the telephone number assigned to the internal modem of the PBX, several pause symbols (',') and the Remote Maintenance Feature Number (for example: 01234567,,,,,729).
2. Select Auto (Tone) for Dial Type.
3. Click OK.
4. Click OK. The PC will connect to the PBX.
Notes
The number of pause symbols to be inserted differs depending on the PC modem used.
Auto (Pulse) Dial Type cannot be used.
When the mode of the PBX outside (CO) line that will be accessed is 'Normal':
1. For Dial Number, enter the pause symbol (',').
2. Select Manual for Dial Type.
3. Click Initialise.
4. Click OK.
5. Click OK.
6. Dial the telephone number assigned to the outside (CO) line from a telephone connected in parallel with the PC.
7. Ask the respondent to transfer the call to the internal modem of the PBX. ('Transfer' + 'Remote Maintenance Feature number')
8. Click OK and wait for 2 or 3 seconds, and then go on-hook before you hear a tone from the modem. The PC will connect to the PBX.
Notes
The AT command 'Use V.22bis' may be required to configure the modem to communicate with the PBX, depending on the modem (for example: "AT + MS = V22B").
The AT commands 'Use V.42' and 'Use V.42bis' may be required to configure the modem to communicate with the PBX, depending on the modem.
The AT command to dial without waiting for a dial tone may be required to configure the modem to communicate with the PBX, depending on the modem.
The AT command to set the Result Code format to text beginning with 'CONNECT' when a connection is established may be required to configure the modem to communicate with the PBX, depending on the modem.
If the Baud Rate (bps) is set too high or too low the modem may not be able to communicate with the PBX, depending on the modem or PC. In this case, adjust the Baud Rate (bps) and reconnect to the PBX.